Welcome To Your Free Trial of SUMO Scheduler
Before you dive in, there are a few pre-steps you need to complete in your Salesforce Org. Don’t worry, we’ve got you covered every step of the way. Let’s get started!
1. Complete Pre-Installation steps
2. Install SUMO into your sandbox
3. Set-up and configuration
If you encounter any difficulties or have questions, please don’t hesitate to contact our technical support for assistance.
Pre-Installation
Complete these quick pre-installation steps to unlock the full potential of SUMO Scheduler on your Salesforce Org. It’ll only take 10-15 minutes of your time. Get ready for an enhanced scheduling experience!
1. What is included in SUMO CEP?
2. Chatter
3. Shared Activities
1. From Setup, navigate to:
- Lightning: Setup | Activity Settings.
- Classic: Customize | Activities | Activity Settings.
- Select the checkbox next to Allow Users to Relate Multiple Contacts to Tasks and Events.
2. Add the Name related list to the Event Page Layout(s).
- Lightning: Only add this via Classic. If you use Lightning Build App Pages for Events, the related lists should still be determined from the layout in Classic.
- Classic: Customize | Activities | Event Page Layouts
- Click Edit
- Add the Related list Name to the related list section on the layout.
If you still need help, you may go here to learn more about this Salesforce feature.
4. Lightning or Classic Experience
All SUMO functionality is available in both Salesforce Lightning and Salesforce Classic mode. For Classic Mode, you must complete this quick step first.
If you are going to be using Salesforce Events along with SUMO please check this article.
5. Enable Digital Experiences
From Setup, navigate to:
- Lightning: Setup | Feature Settings | Digital Experiences | Settings.
- Classic: Setup | Customize | Digital Experiences | Settings.
- Select the checkbox next to Enable.
6. Define Your Site Domain Name
From Setup, navigate to:
- Lightning: Setup | User Interface| Sites and Domains | Sites.
- Classic: Setup | Develop | Sites.
- Setup your domain name.
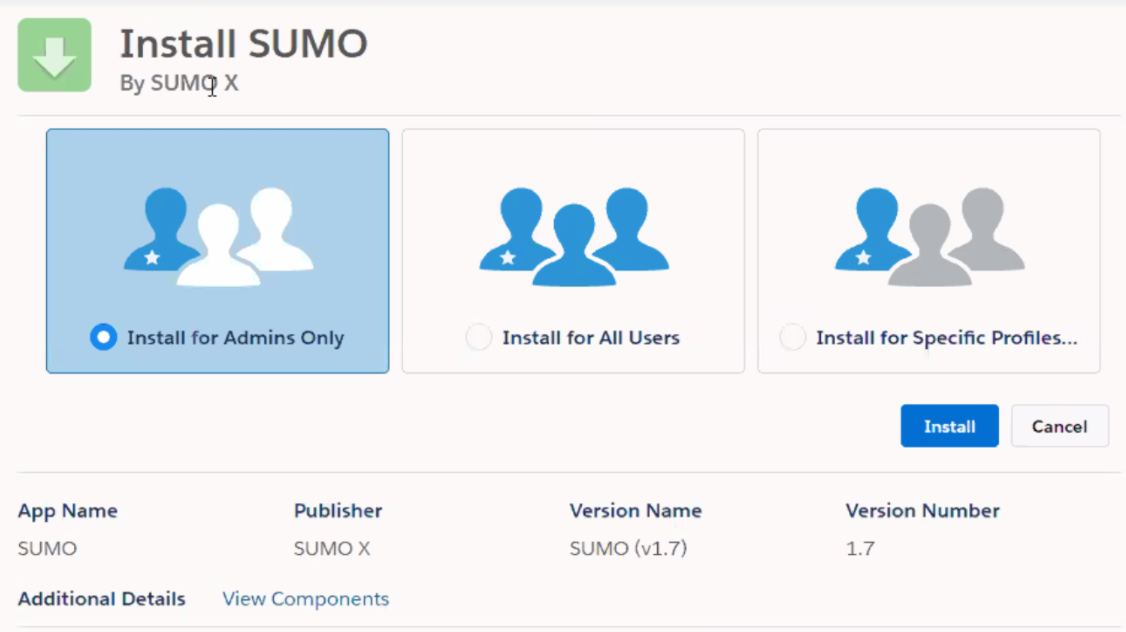
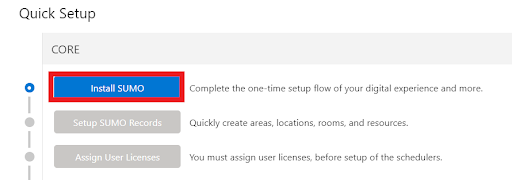
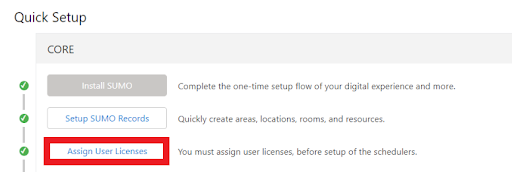
Install SUMO
Congratulations! You are now ready to install SUMO CEP into your Salesforce sandbox or production environment.
Self-Install SUMO Trial
SUMO recommends installing into your Sandbox first. Installing SUMO with this method currently requires some assistance from our customer support team.
5. Approve the third-party access information. This shows a list of websites that the package might send data to or receive data from during operations.
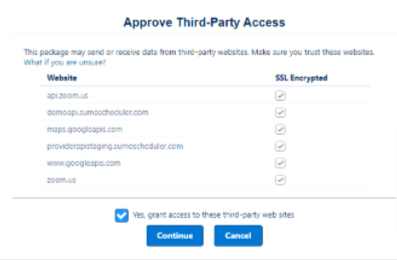
| Google APIs | This is a Web API used to make call out to the Google Maps API in order to render maps and use GeoLocation to find nearest locations when scheduling. |
| SUMO Calendar Connector | Required to allow SUMO to check free/busy availability on SUMO Users calendars in real-time, necessary to automate appointment & event scheduling. |
7. Click Continue to start the install.
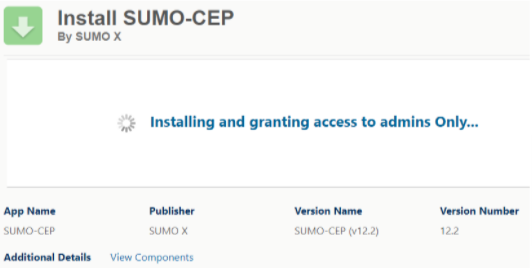
8. The installation process begins and can take up to 30 minutes. You will be notified by email when it is completed.
NOTE: You can also view the status of the Installation by going to Setup| Deploy | Deployment Status
Post-Install Configuration
Once SUMO is installed into your org you can use the Admin quick setup process. The process will walk you through all of the steps required to get SUMO up and running in your org in no time.
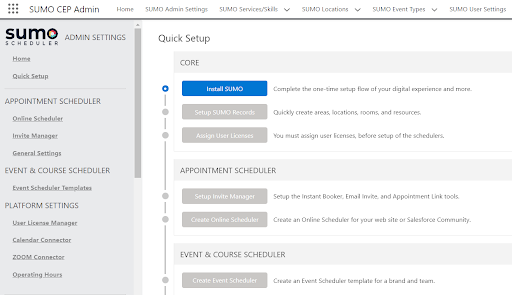

Setup Invite Manager
- Instant Booker
- Email an Invite
- Appointment Links
You can create your services and resource pools from this step as well.
Create Online Scheduler
Create a process for your Website or your community.
You will be able to copy the links to add to your website once you have completed the steps.
Create Event Scheduler
Create the process for your Events and Courses.
You will be able to create Event types and Skills from this step.
Note: Before you can test the process you just created users will need to have their calendars connected and availability defined. You will also need to add the users to the services you created as well.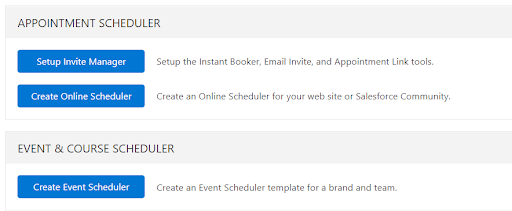
You can then move to the Test and Deploy stage.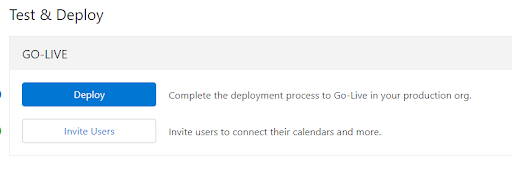
6. New Appointment and Email an Invite Buttons
- Navigate to Setup | Object Manager | Find Object you would like to add the buttons to.
- Click on Page Layouts | Select the Page Layouts you would like to add the buttons to
- (Lightning) Select Mobile & Lightning Actions
- (Classic) Buttons – Drag the buttons to the page Layout
- Click Save.
Note: Out of the box this is available for Contacts, Leads, Accounts, and Cases. See below for setup for other objects.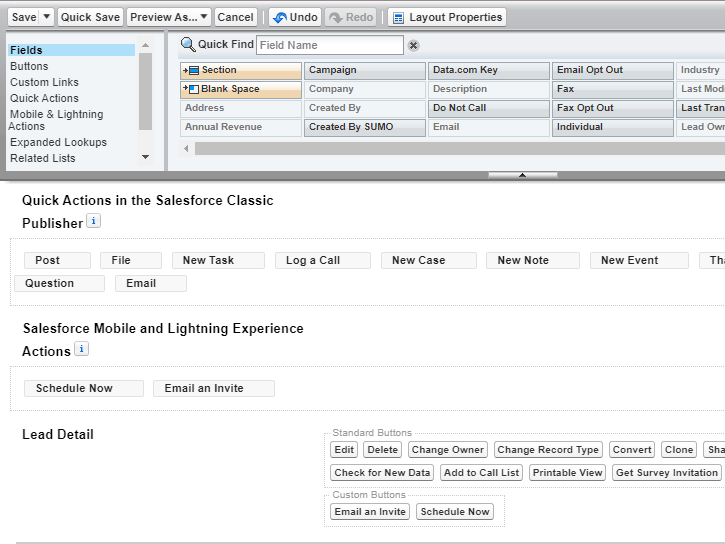
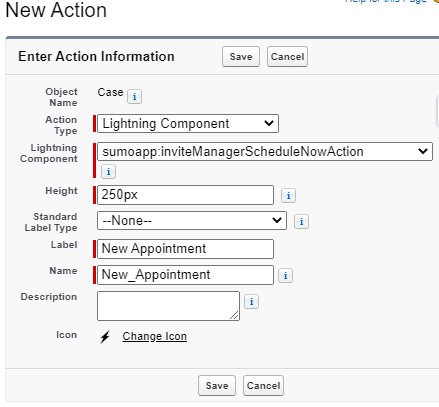
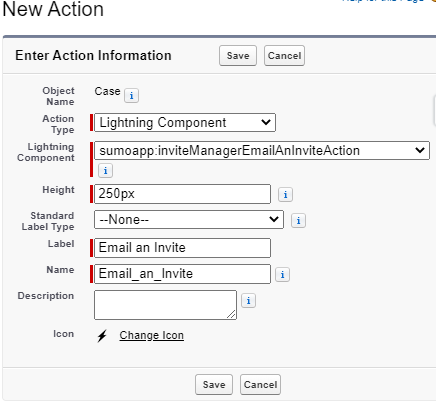
7. Add Additional Standard or Custom Objects to Invite Manager
- This will allow you to assign an invite manager process to add additional standard or custom objects.
- Navigate to Setup | Object Manager | Select the object
- Click on Buttons, Links and Actions
- Click on New Action (This allows the Email New Invite and New Appointment Button to be available for adding to the page layout.)
- To add a New Appointment button fill in the boxes as seen below.
- Repeat the steps above to add the Email An Invite button and complete the box as shown in the picture below.
- Navigate back to Setup | Object Manager | Scheduling Process
- Click on Fields & Relationships
- Find the field “Invite Template Sub Type” and click on it.
- Scroll down to the Value section and click new to add to the picklist
- Enter the API name of the object as the value.
- Check the box next to both Invite Manager and Online Scheduler Record types
- Click Save
- Review the values section again, you may want to update the label for this object as it will currently show the API name
- Click edit next to the Value that you want to change and make the change to the Label field only and click Save.
- Click on Fields & Relationships again while on the Scheduling Process object.
- Click on Field Dependencies
- Click edit next to Invite Template Type
- Add this object as an included value under Salesforce Objects
- Highlight the object name
- Click Include Values
- Save
- Add this object as an included value under Salesforce Objects
- Return to Object Manager and click on the Object to add the buttons to the page layouts
- Click Page Layouts
- Add the Email An Invite & New Appointment buttons to the appropriate page layouts for this object
Congratulations!
Your Free Trial Is Now Set Up & Ready to Go!
Make the most of your SUMO experience. Learn more about The Powerful Tools Included In Your Free Trial.
SUMO Appointment Scheduler
Online Appointment Scheduler
SUMO’s online scheduler can be added to any website, microsite, social media page or Salesforce Community. Custom resource pools and assignment logic ensures that customers are booked with the right person, at the time and location.
Instant Booker
Leverage real time calendar availability to book appointments directly from within Salesforce.
Invite Manager
Email a custom meeting invite to a prospect or customer. – They click the link, choose a time, and the meeting is automatically booked on everyone’s calendar.
Appointment Links
Create custom appointment invite links to send to customers via email, text, marketing campaigns etc. Schedule on behalf of yourself and others.
SUMO Events & Classes Scheduler
Event & Class Suite Scheduler
Create and manage marketing events and classes that build brand value and customer loyalty.
Get Help During Your SUMO Trial
Contact Support
Log A Case
To start this process, you will need to submit a case with our customer support team with the subject SUMO Trial Request.
It’s critical that you provide us the following key attributes in your email (or case):
- Company Name
- Org Name
- Org ID

Powering Customer Conversations
PLATFORM
APPOINTMENT SCHEDULER
EVENT & CLASS SCHEDULER
QUEUE SCHEDULER
RESOURCES
SUMO Scheduler
11545 Park Woods Circle - Suite B
Alpharetta, GA 30005